Předkládám informace získané na internetu a jejich částečný překlad. Nejen proto, že uvedenou pistoli již pár týdnů zkouším a možná se uvedenými problémy setkám, ale i pro kolegy a kolegyně, aby věděli, že něco takového existuje. Ti z vás, kteří ovládají angličtinu, mohou využít původních informací, odkazy jsou v podtržených nadpisech. Petr 25.12.2012
Děkuji
vám kluci za
odpovědi. Našel jsem staré téma v archivu,
které mi pomohlo vyřešit problém.
Není to tak úplně jednoduché, ale funguje to a dá se to
zvládnout.
Ve skutečnosti problém souvisí s nízkým odporem na druhém stupni, jak už napsal Mark Briggs. Pokud někdo má
zájem, je zmíněné původní téma uvedeno: " Morini 162
problém se spouštěním " (poslední
odpověď v 20 září 2003), a
David M postup popsal:
" Nejprve musím říči, že seřízení odporu prvního a druhého stupně nebo dráhy (první
stupeň) by nemělo mít žádnou souvislost s problémy, které jste
předtím uváděl. Je velmi pravděpodobné, že ve vašem případě
vyvolává tyto problémy velmi malý odpor spouště na druhém stupni při velmi
jemném nastavení sepnutí mikrospínače, (podobně tomu může být i s velmi krátkou dráhou druhého
stupně). Před správným seřízením spouště bude nutné znovu nastavit mikrospínač.
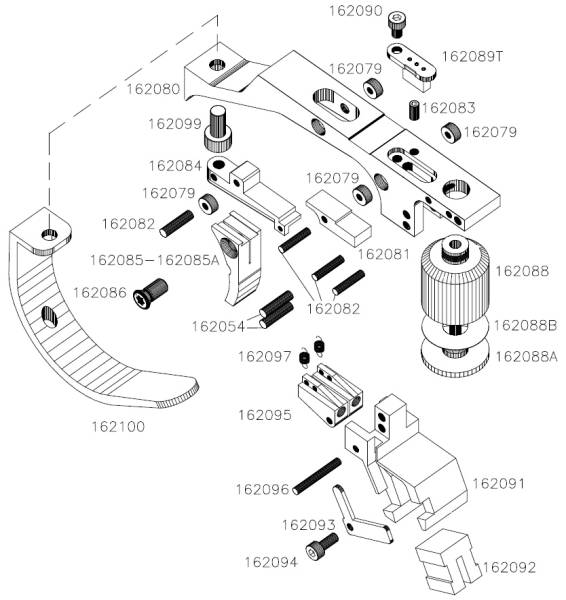
Mikrospínač lze nastavit imbusovým šroubem, který se nalézá na
vrcholu spoušťové sestavy, následovně:
1 – Demontujte rukojeť.
2 - Vyšroubujte šroub na přední části lučíku, vyjměte
lučík.
3 – Vytlačte příčný kolík v zadní části spouštěcí
sestavy a vyjměte spouštěcí sestavu z rámu.
4 - Vyhledejte
seřizovací imbusový šroub (162083) u mikrospínače, na vrcholu spouštěcí sestavy.
5 – Zasuňte desku elektroniky do
spouštěcí sestavy. Nyní můžete zapnout
vypínač a zkuste
spoušť.
6 – Zasuňte imbusový klíč do šroubu
(162083) a otočte o 1 celou otáčku proti směru hodinových ručiček
(dosáhnete maxima nastavení).
7 - Pomalu
a citlivě otáčejte šroubem zpět, ve
směru hodinových ručiček, až spouštěcí elektromagnet sepne (dosáhli jste bodu
samospuštění mikrospínače).
8 – nyní vraťte šroub (proti směru hodinových ručiček) nejméně o1/4
až 1/3 otáčky (menší otočení než o 1/4 otáčky vám může znovu způsobovat původní problémy.).
9 – Opakovaně prozkoušejte funkci
spouště. Pokud je vše OK, sestavte
pistoli.
10 - Nyní můžete
nastavit dráhu spouště, první a druhý
odpor podle vašich představ (doporučeno
300-400g na prvním odporu, 200-100g na druhém, s celkovou dráhou spouště
3-5mm.
11 - DŮLEŽITÉ
– nastavte to jednou a pro vždy, přesně podle výše uvedeného návodu a už do toho
nešťourejte, jasné !!!!!!!!! "
Posted: Wed Dec 01, 2004 3:34 am
Post subject: Morini CM162EI problem
I bought a Morini CM162EI and ajusted trigger take up and
first stage travel to my preferences. After that, the eletronic start blinking
(and the trigger doesn't work). The trick is that the problem occurs sometimes,
not always, but now I don't have confidence enough to rely on my gun in a
competition.
Did anyone have similar a problem? It has been solved?
Thanks in advance for answers.
Thank you guys for answers. I've found an old topic in
archive that solved the problem. It's a bit complex, but it works.
In fact, the problem is related with minimum second stage
weigth as Mark Briggs said. If anyone is interested, the topic I've mentioned
is "Advise needed: Morini 162 trigger problem" (last reply in Sep 20,
2003) and the steps posted by David M are:
"Firstly, the adjustment of first and second stage
weights or trigger travel (first stage) should not have any effect on your
discharge problem.
It is possible to cause your problem if the second stage
weight is set to very little and you have a very fine switch setting (similar
to second stage travel),there won't be enough weight to re set the switch.
The switch adjustment is a allen screw in the top of the
trigger assy.
1- Remove your grip.
2- Remove the screw at the front of the trigger guard,
remove the trigger guard.
3- Remove the cross pin at the back of the trigger assy,
remove the trigger assy from frame.
4- Locate the adjusting allen screw just forward of the
top of the switch, on top of the trigger assy.
5- Re fit the trigger assy only onto the circuit board in
the grip. You can now turn on the switch and try the trigger.
6- Fit allen key in screw and turn 1 full turn
anti-clockwise (give maxium adjustment).
7- Slowly turn screw clockwise until the trigger solenoid
fires.(switch activate position).
8- Turn screw back (anti-clockwise) 1/4 to 1/3 turn only.(
Less than 1/4 turn can give you the origional problem.)
9- Try trigger for function. If OK re assemble pistol.
10- Now reset Trigger travel, first and second stage
weight to your liking.(suggest 300-400g on first stage, 200-100g on second with
3-5mm of travel on trigger.
11- IMPORTANT ONCE SET LEAVE THE BLOODY THING
ALONE!!!!!!!!!"
|
mcmoura
wrote: |
|
11- IMPORTANT ONCE SET LEAVE
THE BLOODY THING ALONE!!!!!!!!!" |
It isn't fair to say that to a shooter, they will just treat
it as a challenge.
Advise needed: Morini 162 trigger problem
Posted: Mon Sep 15, 2003 3:42 am
Post subject: Advise needed: Morini 162 trigger problem
Frankly
speaking, my Morini has been serving me
faultlessly for a number of years and over 100,000 pellets have been fired.
I tried to adjsut the first and second stage trigger
weight and trigger travel last weekend but yesterday, after 100 or so shots,
the trigger just could not ignite and even the dry fire mode was gone. I
remember someone here mentioned some months ago that inside and behind the
trigger mechanisim there is a screw that regulate the contacts, can anyone
point out where is this screw so that I may try to adjust the contact point.
Thank you so much.
David M Firstly,
the adjustment of first and second stage weights or trigger travel (first
stage) should not have any effect on your discharge problem.
It is possible to cause your problem if the second stage
weight is set to very little and you have a very fine switch setting (similar
to second stage travel),there won't be enough weight to re set the switch.
The switch adjustment is a allen screw in the top of the
trigger assy.
1- Remove your grip.
2- Remove the screw at the front of the trigger guard,
remove the trigger guard.
3- Remove the cross pin at the back of the trigger assy,
remove the trigger assy from frame.
4- Locate the adjusting allen screw just forward of the
top of the switch, on top of the trigger assy.
5- Re fit the trigger assy only onto the circuit board in
the grip. You can now turn on the switch and try the trigger.
6- Fit allen key in screw and turn 1 full turn
anti-clockwise (give maxium adjustment).
7- Slowly turn screw clockwise until the trigger solenoid
fires.(switch activate position).
8- Turn screw back (anti-clockwise) 1/4 to 1/3 turn only.(
Less than 1/4 turn can give you the origional problem.)
9- Try trigger for function. If OK re assemble pistol.
10- Now reset Trigger travel, first and second stage
weight to your liking.(suggest 300-400g on first stage, 200-100g on second with
3-5mm of travel on trigger.
11- IMPORTANT ONCE SET LEAVE THE BLOODY THING
ALONE!!!!!!!!!